

How to set up a Svelte Kit project with VS-Code

Are you planning on using Svelte Kit as your new base for a project, but you have no idea how to set up the project properly? Then this article is perfect for you because I give you my installation routine for when I start a new project.
If you want to know what Svelte Kit is, check out their website. You will find an interactive tutorial that teaches you the basics about this framework.
Set up your first project in Svelte Kit
⇒ Create a folder in which you want to store your local data.
⇒ Open Visual Studio Code into the folder you just created
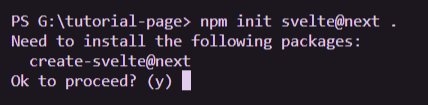
⇒ Open a terminal and enter the following line:
npm init svelte@next .
⇒ Yes, proceed.
⇒ Leave blank because you are already in the right folder

⇒ Use the arrow key and chose “Skeleton Project”

⇒ If you want to use Typescript is personal preference. I usually chose yes, because you can then either use vanilla JavaScript OR Typescript.

⇒ Here I chose yes as well

⇒ This is also going to be installed

⇒ Add playwright as well

⇒ run this code in your terminal
npm install
It will create your project with all of its dependencies.
⇒ after a minute or two, this is how it will look:

Your file structure should look like this (version April 2022):
📁.svelte-kit
📁node_modules
📁src
📁static
📁tests
💾.eslintrc.cjs
💾.gitignore
💾.nmprc
💾.prettierrc
💾.package-lock.json
💾 package.json
💾playwright.config.js
💾README.md
💾svelte.config.js
💾tsconfig.json
Folders and files with a ``` .
⇒ If you want to use **Tailwind**, you can set it up at this point with
npx svelte-add@latest tailwindcss
or
npx svelte-add@latest tailwindcss --daisyui

and then another
npm install
to install the new dependencies. This step is optional and only needed if you choose to use Tailwind.

⇒ run
npm run dev -- --open
and the **development server** will be started. Your browser will automatically open the preview of your project. Changes you do to your project can be found as soon as you save a file.

## Starting the server again later
Every time you come back to your project from now on, you can simply use
npm run dev
From there on you can start making your website in Svelte Kit and check your progress at http://localhost:3000/

---

### Important Links to check out:

- [Svelte Kit](https://kit.svelte.dev/)
- [Typescript](https://www.typescriptlang.org/)
- [Tailwind](https://tailwindcss.com/)

---

### Find us on:

- https://twitter.com/codingchannel
- https://www.tiktok.com/@thecodingchannel
- https://github.com/thecodingchannel


![[Full Tutorial] We build a Python Wordle clone Discord bot with disnake](/_next/image?url=https%3A%2F%2Fcdn.hashnode.com%2Fres%2Fhashnode%2Fimage%2Fupload%2Fv1644609494772%2Fth42uZTxf.jpeg&w=3840&q=75)